Posts


Words chalkboard ART with John Neal with backyard Summer garden for backgroundCreating eye-catching Typography with Zig Posterman markers on a chalkboard

Some chalkboard signs call for an emphasis on text to get their message across. In this video, John Neal creates eye-catching chalkboard typography with Zig Posterman markers. Most of the emphasis is on what kind of event it is, a summer fair, and the date it occurs. The other important piece of info is where it is held, in this case at the Village Green. John does still add an illustration to the sign, but it is not a focal point. Part of what John does well is use several different techniques to add depth and visual interest.


John Neal writing Summer FAIR on chalkboard with Zig Posterman markerBlending

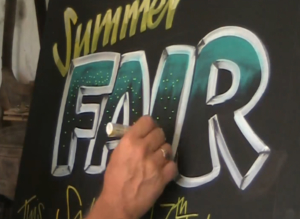
John adds in some shadows and fill color with his markers, but then goes to add some dimension by blending with his fingers. The fill starts off simple, but he blends it to give the appearance of a gradient or feathering effect. Same goes for the shadows. Starting off as simple black lines, John blends the lines until they appear to look like a 3D shadow.

Another blending technique used is erasing. John decides he didn’t quite like the letter “R” at the end of “FAIR”, so he used a black marker to remove some of the edges of the letter. He simply then reused the white marker to draw over the black.


John Neal adding dots inside word FAIR with Zig Posterman markerColors on top of colors

Little dots of yellow are added on top of the blended blue-green he had already added to the word “FAIR”. This shows how easy it is to use different colors, without the fear of them mixing together like with other types of markers. As mentioned earlier, He also does this with ease when he adds in the shadows. This can help depth to an illustration, without having to spend too much time focusing on a more complex illustration.


We hope creating chalkboard typography with Zig Posterman markers will become even easier following these techniques.

You can watch John demonstrate these techniques in his Summer Fair video:

Share on Social Media

Halloween is coming up and John Neal has created a chalkboard art sign for the holiday. We join John in his studio where he creates this spooky spectacular with Zig Posterman Waterproof Markers.

Notice the borders and guidelines that he adds to the board with a light pencil mark. Here in our studios we like to use a Violet Zig Illumigraph marker because it can be removed by rubbing when you are done or even using a damp cloth. No worries on your design since when dry the Zig Posterman Waterproof can not be removed except with Windex.

Tools to Create a Chalkboard Art Sign

Using a 15mm Orange the letters are made with “dripping” bottoms by lifting the marker at the end of the stroke. Since the Posterman marker will not smear when you go over your original marks you can darken up the text where you need to after the first layer is dry.

Cohas Chalkboard Tip!

Need some low cost blackboards? Use 1/4 inch MDF or Masonite boards. You can have them cut for you at Home Depot, Lowe’s or you local lumber yard. No need for Chalkboard paint, we have a new and unique plastic chalkboard product called Cohas Chalkflex.

If you don’t like your design you can clean it off and make a new chalkboard art sign.

More likely you will share them with friends or even sell them on Etsy.

Watch carefully when he gets to the point of making the moon. John is using a white Big and Broad marker the mixed color creating a three dimensional look to the moon is a blending of the slightly wet orange text underneath. Don’t work about your marker tip, it can be blotted out so it will be clean like new.

Using a Florescent Orange 6mm broad chisel marker to highlight the edges of “Halloween” to provide a bit of a glow to the design. White highlights along the top make it look like the moon is shining down on your design. The highlight techniques can be applied to many of your designs.

Interested in learning more from John Neal Chalkboard Artist? Visit his Chalkboard Artist Website for a full length downloadable video. Make sure you let him know “Zig sent me!”

Markers used in this video.  15mm White and Orange, 6mm White, Orange, Light Blue, Violet and Black.

Did you catch the witch in the moon at the end?

What is Cohas Chalkflex?

Cohas ChalkFlex material is an adhesive chalkboard polymer that comes in many different sizes. It is perfect for turning any smooth surface into a chalkboard. It features a slate gray, textured surface that is sturdy yet flexible, providing a quality surface for your chalkboard art sign..

The unique thickness of the material makes it easy to apply, without worry of sticking to itself. It goes on smoothly and bubbles or imperfections that may be under the surface are easily hidden. ChalkFlex is also easily replaceable. The material adheres well to many smooth surfaces, but will also remove easily when needed!

Cohas Chalkflex Chalkboard graphic showing how to install this Flexible chalkboard. Includes graphic showing difference with Chalkboard Paint, Chalkboard Vinyl and Chalkboard Contact Paper

This infographic shows how to install Cohas Chalkflex on a raised panel kitchen cupboard.  If you picked up MDF or Hardboard at your local hardware store you will find the instalation even simpler.  Order one size larger than you need or order Chalkflex by the foot.  Lay down the board on a large table, fold over one edge to make a tab. Position, press down the tab, as you remove the backer smooth out the Chalkflex plastic chalkboard.  Trim off the edges, frame if required and you are ready for a new chalkboard art sign.

Share on Social Media