Posts

In March, it was announced that the Woodcraft waterproof markers were being reintroduced as the Acrylista marker line.  At this time, we also learned that some colors were being discontinued. Due to a large customer uproar, the manufacturer agreed to a limited distribution of the discontinued colors in the 6mm and 15mm Woodcraft line. Because many of our chalkboard artists “love all of the Woodcraft colors and honestly wish there were more!” this comes as great news.

Therefore, we can once again offer chalkboard artists the variety of colors they need. The Cohas color collection of waterproof chalk markers have become very popular with chalkboard artists at grocery stores, restaurants, bakeries, and breweries. As a result, artists can choose from a blend of colors like Wild Rose, Forest Green, Golden Yarrow, Honeysuckle, Salsa Verde, and Victorian Blue. As a result, the continued production of these markers means chalkboard artists will now have a wide selection of colors to create realistic portrayals of fruits, vegetables and other graphics.

Picture of Cohas Slate, EZ to Change and Eco Board examples by Chalkboard Artists

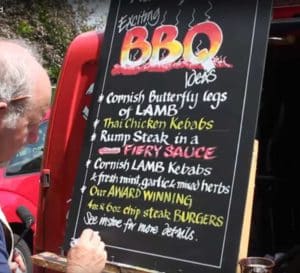
Our in-house chalkboard artists also use the Zig Posterman, Acrylista and Woodcraft colors. Resulting in the above chalk art that uses our own custom products the EZ to change boards , Eco boards and New England slate products.  Most of all, our custom products work great for DIY weddings, special events, chalkboard art, menu design specials, and so much more.

Our popular Custom Pineapple Slate Board is made with a variety of all of the marker lines.

A List of the Cohas Color Offerings available to Chalkboard Artists

6mm Colors15mm Colors
Zig Posterman
AcrylistaWhats Back in Woodcraft
Zig Posterman
AcrylistaWhat’s Back in Woodcraft
White
Black
Red
Pink
Blue
Light Blue
Green
Yellow
Brown
Orange
Violet
Florescent Yellow
Florescent Orange
Florescent Pink
Florescent Green
Gold
Silver
Metallic Green
Metallic Pink
Metallic Brown
Metallic Violet
Metallic Blue
Metallic Red
Wild Rose
Strawberry
Country Blue
Harebell
Forget Me Not
Bluebell
Forest Green
Sedum
Green Apple
Salsa Verde
Gardenia
Primrose
Burnt Sienna
Buttercup
Burnt Umber
Flesh
Honeysuckle
Wisteria
Wild Heather
Slate Gray
Jubilee Cherry
Brick Red
Victorian Blue
Periwinkle Blue
Glacier Blue
Moss Green
Desert Cactus
English Cucumber
Golden Yarrow
Marigold
Cabernet
White
Black
Red
Pink
Blue
Light Blue
Green
Yellow
Brown
Orange
Violet
Florescent Yellow
Florescent Orange
Florescent Pink
Florescent Green
Gold
Silver
Wild Rose
Strawberry
Country Blue
Harebell
Forget Me Not
Forest Green
Green Apple
Salsa Verde
Gardenia
Primrose
Burnt Sienna
Buttercup
Burnt Umber
Flesh
Honeysuckle
Wisteria
Wild Heather
Slate Gray
Jubilee Cherry
Glacier Blue
Moss Green
English Cucumber
Golden Yarrow
Marigold
Cabernet

Cohas.com is a one stop store for graphic artists, sign painters, and chalkboard artists because we offers many different markers types, colors and sizes. Check out our entire line of markers and chalkboard products on our website.

6mm Waterproof Cohas color collection

15mm Waterproof Cohas color collection

Share on Social Media

Although calligraphy is often created with a pen or brush, high school English teacher Cale Borne is breaking the mold. He has learned how to write calligraphy with Zig Posterman markers. And Cale is inspiring his students by sharing his talent on his classroom chalkboard.

Cale wanted markers with wide tips that he could use for his calligraphy. He found the Zig Posterman BIGGIE and Big and Broad markers. “These markers are awesome,” says Cale. “I had this big blackboard in my room that was utterly useless unless I wanted to douse myself in chalk dust everyday.”

Cale Borne has leared to write calligraphy with Zig Posterman markers; the words British Romanticism appear on her classroom chalkboard in calligraphic lettering

Traditionally, calligraphy is created using a pen and ink or brush and ink combination. Artists create the ancient lettering by dipping their nibs or brushes into the ink and drawing it across the paper in artistic strokes.

A close up of British that Cale Borne wrote in calligraphy with Zig Posterman markersUsing a similar method, Cale can write calligraphy with Zig Posterman markers. Because the marker has a rectangle tip, he can create varying line widths. This allows him to mimic the strokes that are common with calligraphy. He uses the width of the tip for broader lines, and the edge and corners create thin lines and curls.

“My kids love the lettering I do for their notes and lessons,” states Cale. As a result, he’s able to inspire his students to learn calligraphy. “Several students over the past 2 years have even taken up calligraphy as a hobby after seeing the stuff on my board. I was able to show them something they probably wouldn’t have been exposed too, and that they found something creative to practice and get disciplined with.”

Did you know?
Contemporary calligraphy is defined as “the art of giving form to signs in an expressive, harmonious, and skillful manner.”¹ It began as a standard in handwriting with the development of Latin script in 600 BC. However, it has since become a popular art in writing eloquently. Calligraphy is therefore commonly used for wedding and event invitations, hand-lettered logo designs, religious art, graphic design and commissioned art, and memorial documents.

Want to know how you can write calligraphy with Zig Posterman markers?

Cale used the Big and Broad 15mmBIGGIE 30mm, and BIGGIE 50mm tip markers to create calligraphic lettering. Customers can use both waterproof and wet-wipe markers for these projects. Although it is recommended that waterproof is used where retracing or color overlap may occur.

¹Source: Wikipedia.org.

Share on Social Media

Halloween is coming up and John Neal has created a chalkboard art sign for the holiday. We join John in his studio where he creates this spooky spectacular with Zig Posterman Waterproof Markers.

Notice the borders and guidelines that he adds to the board with a light pencil mark. Here in our studios we like to use a Violet Zig Illumigraph marker because it can be removed by rubbing when you are done or even using a damp cloth. No worries on your design since when dry the Zig Posterman Waterproof can not be removed except with Windex.

Tools to Create a Chalkboard Art Sign

Using a 15mm Orange the letters are made with “dripping” bottoms by lifting the marker at the end of the stroke. Since the Posterman marker will not smear when you go over your original marks you can darken up the text where you need to after the first layer is dry.

Cohas Chalkboard Tip!

Need some low cost blackboards? Use 1/4 inch MDF or Masonite boards. You can have them cut for you at Home Depot, Lowe’s or you local lumber yard. No need for Chalkboard paint, we have a new and unique plastic chalkboard product called Cohas Chalkflex.

If you don’t like your design you can clean it off and make a new chalkboard art sign.

More likely you will share them with friends or even sell them on Etsy.

Watch carefully when he gets to the point of making the moon. John is using a white Big and Broad marker the mixed color creating a three dimensional look to the moon is a blending of the slightly wet orange text underneath. Don’t work about your marker tip, it can be blotted out so it will be clean like new.

Using a Florescent Orange 6mm broad chisel marker to highlight the edges of “Halloween” to provide a bit of a glow to the design. White highlights along the top make it look like the moon is shining down on your design. The highlight techniques can be applied to many of your designs.

Interested in learning more from John Neal Chalkboard Artist? Visit his Chalkboard Artist Website for a full length downloadable video. Make sure you let him know “Zig sent me!”

Markers used in this video.  15mm White and Orange, 6mm White, Orange, Light Blue, Violet and Black.

Did you catch the witch in the moon at the end?

What is Cohas Chalkflex?

Cohas ChalkFlex material is an adhesive chalkboard polymer that comes in many different sizes. It is perfect for turning any smooth surface into a chalkboard. It features a slate gray, textured surface that is sturdy yet flexible, providing a quality surface for your chalkboard art sign..

The unique thickness of the material makes it easy to apply, without worry of sticking to itself. It goes on smoothly and bubbles or imperfections that may be under the surface are easily hidden. ChalkFlex is also easily replaceable. The material adheres well to many smooth surfaces, but will also remove easily when needed!

Cohas Chalkflex Chalkboard graphic showing how to install this Flexible chalkboard. Includes graphic showing difference with Chalkboard Paint, Chalkboard Vinyl and Chalkboard Contact Paper

This infographic shows how to install Cohas Chalkflex on a raised panel kitchen cupboard.  If you picked up MDF or Hardboard at your local hardware store you will find the instalation even simpler.  Order one size larger than you need or order Chalkflex by the foot.  Lay down the board on a large table, fold over one edge to make a tab. Position, press down the tab, as you remove the backer smooth out the Chalkflex plastic chalkboard.  Trim off the edges, frame if required and you are ready for a new chalkboard art sign.

Share on Social Media

Spring has sprung and that means it is time for barbecues! Here in this video, John Neal the sign writer creates a chalkboard for Aubrey Allen Butcher’s using markers and paint.  The Zig Posterman Chalkboard Art will bring customers in much more than a machine printed poster on a sandwich board.  While customers may be interested in the tasty BBQ offered by Aubrey Allen the Butcher, they will also stop and admire unique chalkboard art more often than you may think.

Starting the Zig Posterman Chalkboard Art Project

First, John added the letters “BBQ” to the board with a light pencil mark. In our studios we like to use a Violet Zig Illumigraph marker because it can be removed by rubbing when you are done or by using a damp cloth. After, John uses a 30mm White Zig Posterman marker for the base, adding color on top of once it drys. You can use a hair dryer, or if it is a nice day like in this video it will air dry very quickly.

Zig Posterman Chalkboard Art Butchers BoardHe then uses a 6mm White Zig Posterman marker for the small lettering. Don’t worry about overlapping where you can use a black marker to clean it up after you are done. John then adds the colors Red, Orange and Yellow to the letters, adding a “firey” affect using a Big and Broad 15mm marker. Starting with red at the top, followed by orange and yellow. While it is still wet, he uses his finger to rub in the colors to smooth out the red to orange. Moving quickly, he adds the yellow and smooths it out into the orange which is also followed by white.

The next step he uses a broad chisel 6mm white and red marker to outline the letters and add affects. The next step, he uses a 15mm Red and White marker to make charcoal under the BBQ. John then uses the Violet Zig Illumigraph marker to add 5 sections of 2 lines for an outline of where he will list the items using a small paint brush, and alternate colors. Notice how he dabs the marker on a flat service to get the paint. To clean up the chalkboard John uses Black paint to make it as good as new!

Learn More!

Interested in learning more about Zig Posterman Chalkboard Art  from John Neal Chalkboard Artist? Visit his Chalkboard Artist Website for a full length downloadable video. Make sure you let him know his friends at Cohas Chalkboard Systems sent you!

Share on Social Media

Zig Posterman markers work wonders on a variety of surfaces, including of course chalkboards! With a little bit of imagination, one can create amazing and unique arts and crafts projects with these great markers, just like Kristina Gulino, author on Nook & Sea. Kristina created this wonderful DIY wine bottle art, a great counter top or kitchen decoration, specially made for and by you!

Here’s her story:

DIY Wine Bottle Art with Chalkboard Paint and Cohas Zig Posterman Chalk Markers“My chalkboard paint came! Woohoo! Last night I did a little birthday project for myself and completed the chalkboard paint wine bottles for the kitchen. Unfortunately, they didn’t fit where I wanted them to (my fault for grabbing one bottle that was a tad too tall to squeeze between the top of the cabinets and the ceiling), but I think will work just as well on the counter. What do you think?

Chalkboard Paint Wine BottlesThe DIY Wine Bottle Art Prep:

Goo-Gone’s Sticker Lifter (this version might be best, I used the standard one with the scraper attachment)
A small flat paintbrush
One 2 oz. tube of chalkboard paint (I had plenty left over!)
A white chisel-tip chalkboard marker

Chalkboard Paint Wine Bottles and markersThe DIY Wine Bottle Art Doing:

1) Remove wine label (optional) – Soak the empty wine bottles in a sink or bucket filled with warm water for 20 minutes. Take out and use Goo-Gone to soak and scrape the rest of the label off. If you want to leave the label on, it would add some interesting texture and be a landing spot for your text.

2) Paint – Make sure your wine bottle is dry and wiped clean. Squeeze a little chalkboard paint onto a plastic bag or plastic party plate and use this as your palette for dipping. Starting at the top of the bottle and working your way down, paint vertically (using top-to-bottom strokes). After the entire bottle is coated, let it dry for 20-30 minutes. Don’t worry if you can still see the glass showing through. Next,  apply a second coat, this time horizontally (using side-to-side strokes) and let dry. Touch up where needed.

3) Write – First, test your marker on a surface to see how it will write, and get a feel for how you want to compose your lettering. Once the entire bottle is completely dry, it should be fine to hold while you write. (Note – while it seems kind of silly to mention, make sure you don’t have any lotion on your hands because it can leave oily fingerprints).

All done! Now go put it somewhere pretty, take pictures, and show your friends!

Chalkboard Paint Wine BottlesTips and Tricks

Writing Redos – Freshly painted bottles do not lend much room for error, as the paint under the ink will also come off if you attempt to wipe your text from the bottle. I suggest you wait a day before completing your bottles with lettering, and gently remove any mistakes with a damp cloth.

Faster Paint Coverage – Psssst! There is also chalkboard spray paint! I didn’t use this because it was evening and I really didn’t have anywhere to spray paint, but it would be best in my opinion. Smoother coverage, quicker drying time, and faster application.

Overall, I’m pretty pleased with how the bottles turned out! Now I’ve gotta figure out what else I can use this stuff on…. see my ideas at my DIY Pinterest board here and be on the lookout for some more chalky-ish posts 🙂

Enjoy!

Founded in June 2011, Nook & Sea is the blog and creative project of Kristina Gulino; California native and avid lover of home interiors and coastal living. Formerly known as Something 2 Write About, Nook & Sea blends the subject of home decor with a medley of interests including DIY projects, cooking and baking recipes, entertaining and events, greenery, style inspirations and personal insight into a simplistic and joyful Southern California lifestyle.

Kristina lives in South Orange County with her husband and delights in sharing her finds and inspirations with her readers. She holds an associates degree in visual communications from The Fashion Institute of Design and Merchandising (FIDM) and a bachelors degree in business management.

Like to try this without the mess and fuss of Chalkboard Paint? Read, Fall DIY Paint Markers on Dark Wine Bottles in our September 2012 application story!

 Please note, the markers that were used in this project were not Zig Posterman sold here in our Cohas Chalkboard Systems store. However, we found this project online and thought it was a great example of how to use our markers! If you’d like to purchase similar markers to those used in this project, view all our waterproof markers here compatible with your DIY wine bottle art project

Share on Social Media